Objective: Define what a delay study is, how it is used, and how to do one.
What is a Delay Study?
A delay study is a formal evaluation of all delays in the process. This differs from a time study in that in this exercise, we are not interested in evaluating process length or defining engineering standards. Delay studies are primarily used to identify process abnormalities that negatively impact processing rates.
Why are delay studies important?
Similar to time studies, time is money. And delays in the process are a waste of time. Making them a waste of money by default.
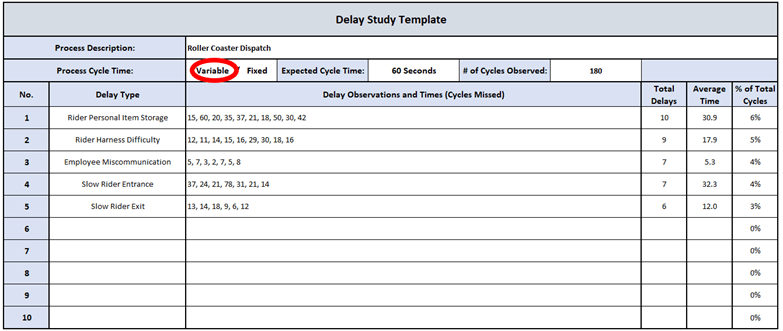
Which brings us to delay studies. These types of evaluations are excellent ways to quantify any reason why a process is underperforming. You may even hear this type of study referred to as a “Missed Cycle Evaluation”. A few examples of this would be: why did patient check-in take 20 minutes instead of 10, why is 1 out of every 5 slots in the powder-coating tunnel empty, why are roller coaster trains dispatching every 75 seconds instead of the standard time of 60 seconds?
Delay studies require eyes on the ground, first hand observations. Through this time out in the operation, you will be able to determine if these delays were due to operator error, machine malfunctions, a supplier not maintaining rate, etc.
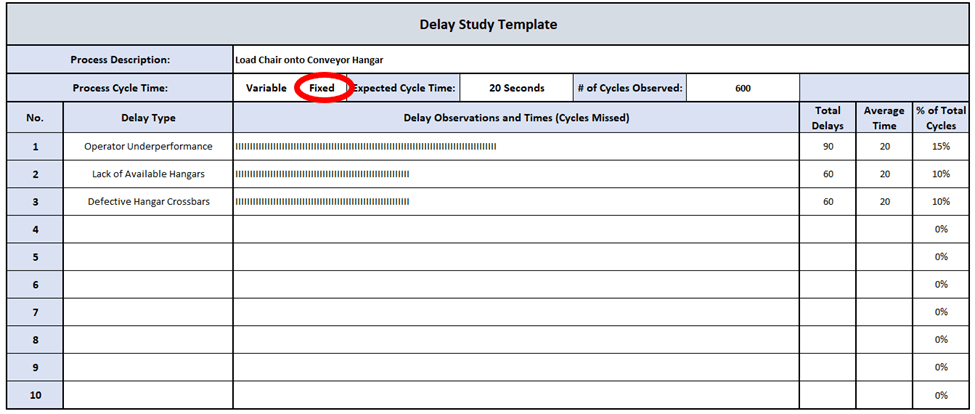
Let us illustrate this with a furniture manufacturing example. In this operation, an employee loads metal chairs onto hangars that travel through a series of powder coat machines (a type of spray painting). The employee has 20 seconds to load the chair onto the hangar before the conveyor moves along to the next position.
While the conveyor and powder coating operations have a capacity of 180 chairs per hour, the operation only produces an average of 110 chairs per hour. That is 70 cycles missed per hour each hour. Over the course of an 8-hour shift, that is 560 chairs that could have been painted, but were not. That is enough missed cycles to force an overtime shift on the weekend.
Jamie, an Industrial Engineer for the company, conducted a delay study of the chair hanging operation over an 8-hour shift. She was able to determine the following delays and frequencies:
- Operator Underperformance: 30/hr.
- Lack of Available Hangars: 20/hr.
- Defective Crossbars (to load hangars onto): 20/hr.
Of the average 70 delays (missed cycles) per hour, 30 of those can be corrected via training, and the other 40 can be corrected via maintenance and tooling.
The operations and accounting teams would appreciate addressing these issues, as increased performance in the powder coating operation will contribute towards reducing overtime. On the flipside, sales will appreciate the additional capacity to sell.
So how do we do a delay study?
The first few steps of delay studies are very similar to the time studies in case you have read that how-to already.
Step 1: Identify the information you want to obtain.
This step sounds basic but is very important. Define what you are trying to achieve by doing this delay study. Are you trying to increase throughput without capital investment? Are you trying to quantify the impact of operator performance (or underperformance?)?
Take the time to deeply understand the information you are looking for. Then develop a problem statement that looks like this:
- Evaluate the causes of slow ride dispatches on our newest roller coaster.
- Quantify through deeper observation whether or not production underperformance is employee or facility related.
Step 2: Talk to the person doing the job you are studying.
This step cannot be missed. When performing a delay study, you want to be sure you understand each step in the process, so you can accurately determine where and how often the delays occur.
When you speak to the operator, you will want to ask these questions:
- What are the types of delays you see?
- How often do these delays occur?
- How long do these delays last?
When in doubt, try the job for a few cycles. This basic conversation with the employee will definitely point you in the right direction when performing this delay study.
Step 3: Define the capacity of the operation you are studying.
As with the previous step, this also cannot be missed. Knowing the per hour rate of the process will help you quantify how consequential the delay is. For some processes, 20 delays or missed cycles an hour could bring the production rate to 50%, or could be a small blip on the radar. You have no idea if you do not know what the capacity is.
Step 4: Determine how long you will need to observe the operation.
For the delay study to be effective, you will need to observe the operation for a substantial amount of time. If the process rate is in the ballpark of 200/hr., a delay study of 2-3 hours will be sufficient. If the process rate is lower, more time is needed. A good delay study duration that will tell you the whole story will be 6-8 hours.
Step 5: Write down delay types, quantities, and times.
Now the delay study can begin. This is best done using an excel template, like the one below. For each new delay type observed, write it in a new line on the table. We will also need to get an idea of how long those delays are. If you are really good at delay and time studies, you can combine this with documenting each delay. If not, count the number of delays for a few hours, then spend some more time studying the times of each delay.
Documenting delay times can be done a couple different ways. For steps with highly variable process times, just document the number of delays and get an average time of delay later. If the cycle times are consistent (such as a conveyor or assembly line), document the number of cycles missed per delay OR you could document each individual cycle missed as its own delay, and sum up the totals later (this is easiest).
No need to apply normal and standard times to these delays, just raw times in seconds or minutes will suffice.
And one for the roller coaster dispatch example:
Like the Template? Get it here.
Step 6: Document the delay types, quantities, and times.
Shortly after you collected the delays and times, enter them into an excel table. This gets the data onto the computer and off the notebook. Plus, just as writing notes in class helps you retain information, entering this data into the computer helps you further your understanding of the data you just collected.
Step 7: Quantify the delays by type.
Here we are looking for three pieces of information:
- Total Quantity of Delays.
- Average Time of Delay.
- % of Total Cycles.
This tells us the overall magnitude of the delays, and how consequential each delay type is. Knowing how severe each delay type is will tell you which delays should be addressed first.
Step 8: Identify opportunities to improve the process.
After you have determined the delay types, how frequently they occur, and how long the delays last, ask yourself: How can we reduce these delays? Be sure to brainstorm ideas that impact all aspects of the process. This would include technology, equipment, ergonomics, training, etc.
For the chair factory example, some opportunities to reduce delays would include:
- Train employees on hanging chairs to improve performance.
- Procure more hangars to be available for each cycle.
- Repair and procure crossbars to hang chairs.
Step 9: Communicate the delay study results and recommendations.
Brief the employee and management of the delay study results, and the opportunities for improvement you identified. This allows them to see the study and ask questions (helps with that engineer – employee rapport), provides a starting point to implement recommendations, and validation for concerns that are raised by the employee.

You must be logged in to post a comment.